RECENTLY CHECKED
All projects →
CAIBI ASSESSMENT

UK Train Departure Board

CAIBI VERDICTWORTH CONSIDERING

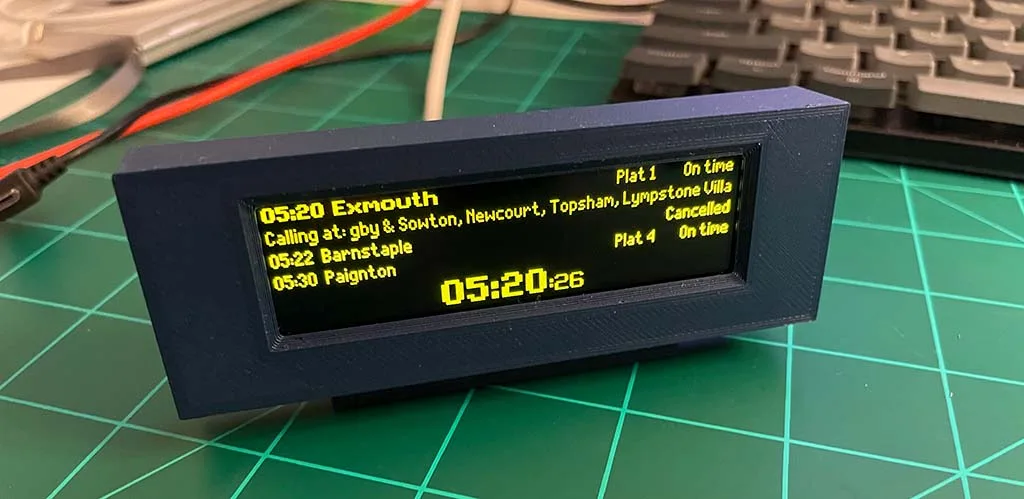
A desk-sized replica of a UK station departure board showing live departures for one chosen station, built from a Raspberry Pi Zero 2 W or an ESP32 and a 256x64 SSD1322 OLED panel in a 3D-printed case.

Build or buy?

Compare the documented build with the purchase reference.

Build it yourself

Known parts cost£52–£85Build total not establishedRaspberry Pi route core parts only; excludes printing, screws, shipping and the time to adapt the data code. UK low end assumes a microSD card is owned; US figures exclude the microSD card. Panel price from a US seller; UK figure converted (~£28).
Time
One or two sessions, plus data-feed changes (CAIBI estimate)
Difficulty
3/5
Physical processes
3D printer or print service · Soldering iron (small jumper change on the panel; required throughout on the ESP32 route) · Multimeter · Small screwdrivers · Computer for flashing an SD card or ESP32
See build requirements →

Purchase reference

Buy price referencePrice not checkedMini Train Departures Board (traindepartures.com)

Check the source for the exact model, availability and what is included.

Check comparison evidence →
Purchase comparison not yet priced
What the prices cover

Built from current retailer prices for the Raspberry Pi route. The panel price is from Newhaven Display (US, USD); CAIBI could not read a current AliExpress, Amazon or UK distributor price, so the UK panel figure is an approximate conversion (~£28) and excludes international shipping. The low end assumes a microSD card is already owned. Several US items were listed out of stock on the check date. US range sums the priced US items (Pi Zero 2 W, panel, supply, jumper wires); no in-stock US microSD price was verified, so it is excluded.

Includes: Raspberry Pi Zero 2 W; 256x64 SSD1322 OLED panel; Certified plug-in micro-USB power supply; Jumper wires; microSD card (upper end only).

Not included: 3D printing, filament or print service; M1.2 and M1.7 self-tapping screws; Shipping and import charges, especially for the panel; Rail Data Marketplace access (free within the published limit); Time to adapt the data code.

Build evidence recorded 24 Sep 2026. Currency conversions are approximate.

The nearest bought equivalent is the Mini Train Departures Board from traindepartures.com at £89 (sale, regular £99), a National Rail departures board of similar size with a USB cable (rated 4.8/5 from 55 reviews on its page). The Miniature Desktop Departures Board from UK Departure Boards is £164.99 (sale, regular £184.99), rated 4.94/5 from 32 reviews, with a 12-month warranty, a USB cable but no plug adapter, Tube, bus and tram data, an internal speaker and paid Premium features; it relies on the vendor's servers. CAIBI's build estimate of £52–£85 excludes printing, screws and panel shipping, and its panel price is a US seller converted, so no saving is claimed. Neither seller lists a US price; the ESP32 creator's own pre-assembled board could not be checked (store blocked access).

UK purchase/source reference ↗UK purchase/source reference ↗


BUILD AT A GLANCE

Source view and main parts

Check the source ↗
PHYSICAL BUILD8 key parts or groups
No.Source specification
01Raspberry Pi Zero 2 W (recommended) or Zero W
02microSD card
03256x64 SSD1322 SPI OLED panel (2.8 inch original
043D-printed case body
054 x M1.2 x 4 mm and 4 x M1.7 x 5 mm self-tapping screws
06Jumper (Dupont) wires or thin hook-up wire
07Certified 5 V plug-in USB power supply and cable
08Alternative route
Full source specifications
  1. Raspberry Pi Zero 2 W (recommended) or Zero W
  2. microSD card, 8 GB or larger
  3. 256x64 SSD1322 SPI OLED panel (2.8 inch original, now reported unavailable; 3.12 inch common)
  4. 3D-printed case body, back cover, two display clamps and desk or hanging mount
  5. 4 x M1.2 x 4 mm and 4 x M1.7 x 5 mm self-tapping screws
  6. Jumper (Dupont) wires or thin hook-up wire
  7. Certified 5 V plug-in USB power supply and cable
  8. Alternative route: ESP32 D1 Mini, 3.12 inch SSD1322 panel, optional TTP223 touch sensor and the gadec printed case
TOOLS / PROCESSES5 involved
  • 3D printer or print service
  • Soldering iron (small jumper change on the panel; required throughout on the ESP32 route)
  • Multimeter
  • Small screwdrivers
  • Computer for flashing an SD card or ESP32
The real-world workYOU STILL HAVE TOThe real-world work
  • Move the panel's zero-ohm resistor or solder bridge to select SPI mode
  • Make and inspect the wiring between panel and board
  • Print the case and fit the panel so it sits centred in the window
  • Melt the mounting posts or solder the power leads inside the case
  • Confirm by watching the board that it matches the real station
DATA ROUTES

Online services this build depends on

All data sources →
Used forServiceStatusAccess
Live departures (Raspberry Pi route)Used by default

The endpoint is hard-coded. New tokens for it are no longer issued, so a new builder needs code changes or the ESP32 route.

  • Official API
  • Existing tokens only · new registration closed
Live departures (ESP32 route)Used by default

The gadec-uk ESP32 board already supports Rail Data Marketplace keys, and still accepts a legacy token.

  • Official API
  • Free registration · 5 million requests per 4 weeks
London Underground (ESP32 route)Optional

Needs a free TfL key.

  • Official API
  • Free key · 500 requests a minute
Bus departures (ESP32 route)Optional

No key.

  • Not reviewed
  • Not reviewed by CAIBI
Weather (ESP32 route)Optional

Used when no OpenWeather key is set.

  • Official API
  • No-key non-commercial access · usage limits apply

Alternatives the code does not use

  • Realtime Trains API: Realtime Trains offers richer running data free for non-commercial use, but neither board supports it. Its legacy api.rtt.io shuts down at the end of September 2026.

Read from the project code on 24 Sep 2026. Service terms change; check the provider before relying on one.

THE BUILD SEQUENCE

How it comes together

1Preparation

  1. Choose the route and secure data access first

    Register at the Rail Data Marketplace and subscribe to the Live Departure Board product before buying parts. Decide between the Raspberry Pi route (needs its data code updated) and the ESP32 route (already supports the new feed).

    AI + YOU
  2. Buy a panel that matches the case

    Confirm the panel uses the SSD1322 controller at 256x64 and check its dimensions against the case files. The Pi case was drawn for a 2.8 inch panel; the ESP32 case is for 3.12 inch.

    YOU
  3. Set the panel to 4-wire SPI

    Move the jumper or zero-ohm resistor on the back of the panel as its printed table directs. Panels usually ship in parallel mode and show nothing until this is done.

    YOU

2Build and assembly

  1. Wire and test before enclosing

    Connect ground, 3.3 V, clock, data, DC, reset and chip select per the source tables, checked against your panel's own pinout. Power up and confirm the splash screen before assembly.

    AI + YOU
  2. Update and deploy the software

    On the Pi route, adapt the request code to the Rail Data Marketplace endpoint and resolve any build errors, then deploy via balenaCloud or plain Raspberry Pi OS. On the ESP32 route, use the web installer and enter the consumer key in the setup page.

    AI
  3. Configure station and filters

    Set the station CRS code, optional destination filter, time offset, refresh interval and blanking hours. Keep the refresh interval sensible for the free request allowance.

    AI + YOU

3Configure and test

  1. Assemble the case

    Fit the panel, secure the board, route the power lead and close the case without trapping wires. The Pi route melts printed posts to hold the Pi and solders power wires to the GPIO header.

    YOU
  2. Check it against the station

    Compare the board with the live National Rail departure page over several days, including disruption, to confirm it shows cancellations and delays correctly.

    YOU
AI IN THIS PROJECT

Get AI help on this build

CAIBI · AI CAN HELP

AI can help with

  • Port the Pi code's SOAP request to the Rail Data Marketplace Live Departure Board REST endpoint when given the product documentation
  • Explain the difference between the legacy OpenLDBWS token and a Rail Data Marketplace consumer key
  • Check a wiring table against the specific panel's datasheet pinout before power is applied
  • Adjust configuration: station CRS code, destination filter, time offset, operating and blanking hours
  • Help resolve build failures such as the cbor2 Rust compiler error reported on balenaCloud
  • Suggest how to run the Python code on plain Raspberry Pi OS instead of balenaCloud
  • Help modify the case CAD for a 3.12 inch panel when given measured dimensions
  • Estimate request volume against the published 5 million requests per 4-week free allowance
CAIBI · AI CAN'T DO

You still need to

  • Move the panel's zero-ohm resistor or solder bridge to select SPI mode
  • Make and inspect the wiring between panel and board
  • Print the case and fit the panel so it sits centred in the window
  • Melt the mounting posts or solder the power leads inside the case
  • Confirm by watching the board that it matches the real station
Original source AI use and prompts
SOURCEThe original project does not publish an AI prompt

The prompts below are CAIBI helpers for this build. They are not presented as instructions from the creator.

CAIBI STARTING PROMPTS

Copy a prompt for this build

Each prompt tells AI to keep the original project source as the reference and to flag anything you must verify on the real build.

Ways to take it further
AFTER THE FIRST BUILD

Ways to take it further

Raspberry Pi Zero 2 W with 2.8 inch panel (canonical, case as published)Raspberry Pi with 3.12 inch panel and a modified caseDual-screen Pi build showing two platformsESP32 D1 Mini with 3.12 inch panel (gadec, adds Tube and bus modes)US transit variant on different hardware, such as the ESP32 LED-matrix Transit Tracker or a GTFS-Realtime display
More routes and resources
OTHER WAYS TO GET THERE

You do not have to follow one route.

REVIEWED RESOURCES

Useful places beyond the main source

SOURCE · CAIBI · BUILDERS

What supports the verdict

SOURCEChris Crocker-White (chrisys), building on work by Chris Hutchinson and Blake (ghostseven)

The canonical repository is active in part: release 0.7.0 on 21 Apr 2026 added multiple destination filters. It has 341 stars, 102 forks and 32 open issues. Independent builders report their builds in the issue tracker (for example issue #131, a builder who completed a 2.8 inch unit and later tried 3.12 inch panels), and several earlier forks exist. Current problems are open and unanswered: #157 (6 Jul 2026, legacy data key no longer works), #154 (12 May 2026, balenaCloud build fails compiling cbor2), #136 (June 2025, 2.8 inch panels unavailable) and #133 (April 2025, 3.12 inch panel does not fit the case). The ESP32 alternative was last updated 6 Sep 2026 and supports the Rail Data Marketplace feed. Evidence of replication is Strong for the hardware; the canonical software's current data route is unconfirmed.

Open source ↗
CAIBIWORTH CONSIDERING

A live departure board for your own station answers one daily question at a glance: is my train on time. The open code lets you filter by destination, set an offset for the walk to the station, blank the screen overnight and, on the ESP32 route, switch to London Underground or bus stops. Building it also gives full control over the data feed and no dependency on a vendor's servers or subscription.

Evidence: Strong

Leave a build review
HAVE YOU MADE THIS?

Leave a build review.

First-hand evidence improves the assessment
What we want to know

What happened when you actually tried to make it.

  • Did it work?
  • Actual time and cost
  • What did you change?
  • What was harder than the source suggested?
  • Would you build it again?