RECENTLY CHECKED
All projects →
CAIBI ASSESSMENT

OpenAstroExplorer v1.0

CAIBI VERDICTBUILD FOR THE EXPERIENCE

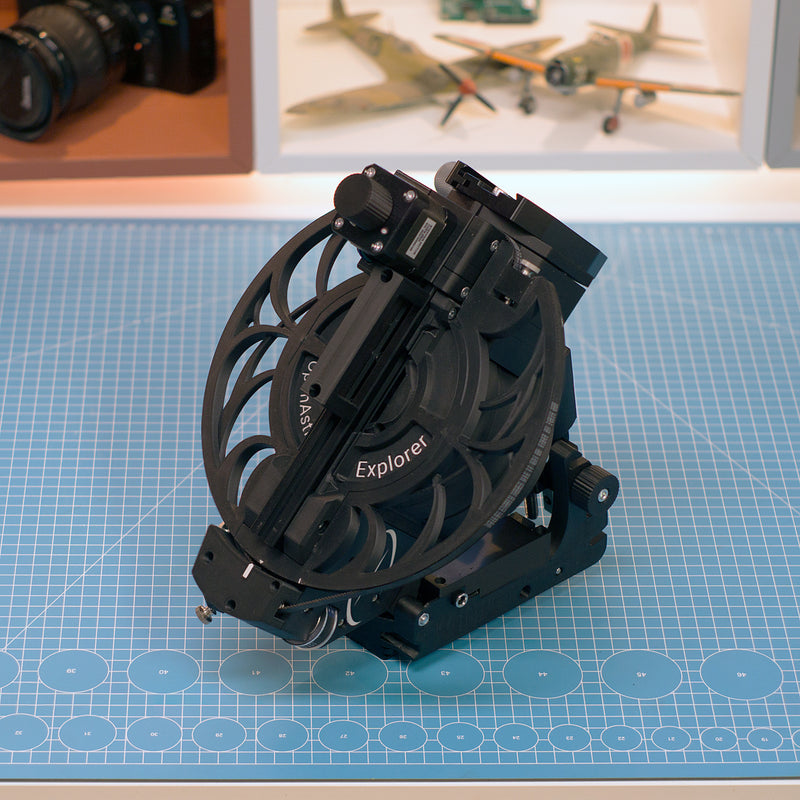
A compact open-source equatorial mount for light-to-midrange astrophotography, combining printed mechanics, belt and worm drives, stepper control and built-in automatic polar-alignment hardware.

Build or buy?

Compare the documented build with the purchase reference.

Build it yourself

Known parts cost£343Build total not establishedDIY kit only; tripod, counterweights and power extra
Time
Multi-stage build, alignment and commissioning rather than a single assembly session.
Difficulty
5/5
Physical processes
3D printer or printed-parts route · Hex keys · Drill and tap for raw-extrusion route · Soldering/crimping for full self-source route
See build requirements →

Purchase reference

Buy price referencePrice not checkedNo priced alternative recorded

Check the source for the exact model, availability and what is included.

Check comparison evidence →
Purchase comparison not yet priced
What the prices cover

The current complete OAE DIY kit is €399. The GBP and USD displays use CAIBI’s dated 4 Sep 2026 FX research snapshot for planning. The source repository separately publishes a $200-350 self-source estimate; CAIBI keeps that as a different route rather than blending it with the prepared seller kit.

Includes: Current €399 complete DIY kit; 65 seller-prepared printed parts with heat-set inserts; About 300 hardware parts and screws.

Not included: Tripod and counterweights; 12 V power supply rated at least 2 A; Camera, lens or telescope; Optional guider and imaging accessories; Shipping, VAT/import effects where applicable; Self-sourcing tools and labour.

Build evidence recorded 5 Sep 2026. Currency conversions are approximate.

The seller’s €499 pre-built OAE listing is out of stock and the seller is unsure whether it will be offered. Mainstream equatorial mounts and star trackers also vary materially in payload, guiding, tripod/power inclusion, support and openness. CAIBI therefore records the OAE build route without manufacturing a commercial saving.

GLOBAL purchase/source reference ↗GLOBAL purchase/source reference ↗
BUILD AT A GLANCE

Source view and main parts

Check the source ↗
PHYSICAL BUILD11 key parts or groups
No.Source specification
01Printed OAE mechanical parts and heat-set inserts or the equivalent seller-prepared printed set
022020/4040 aluminium extrusions and Arca-compatible clamps/plates
036012
04GT2 pulleys and belts
05Custom OAE board
06RA 0.9-degree NEMA 17
07Fasteners
08Sturdy EQ5-compatible or Arca-compatible tripod supplied separately
09Counterweights supplied separately
1012 V power supply rated at least 2 A supplied separately
11Camera or telescope
Full source specifications
  1. Printed OAE mechanical parts and heat-set inserts or the equivalent seller-prepared printed set
  2. 2020/4040 aluminium extrusions and Arca-compatible clamps/plates
  3. 6012, 625, F695, 6907, F6006, 51111 and LM5UU bearing set
  4. GT2 pulleys and belts, 50T worm gear set and MGN9C linear rail
  5. Custom OAE board, ESP32, two TMC2209 drivers and two A4988 drivers
  6. RA 0.9-degree NEMA 17, dual-shaft DEC NEMA 17 and two small Alt/Az steppers
  7. Fasteners, small parts and wiring
  8. Sturdy EQ5-compatible or Arca-compatible tripod supplied separately
  9. Counterweights supplied separately, roughly matched to the mounted gear weight
  10. 12 V power supply rated at least 2 A supplied separately
  11. Camera or telescope, imaging accessories and optional guider supplied separately

TOOLS / PROCESSES4 involved
  • 3D printer or printed-parts route
  • Hex keys
  • Drill and tap for raw-extrusion route
  • Soldering/crimping for full self-source route
The real-world workYOU STILL HAVE TOThe real-world work
  • Choose a latitude, tripod and payload route that suits the actual observing setup
  • Print or buy the mechanical parts and inspect critical fits
  • Drill and tap raw extrusions where the selected sourcing route requires it
  • Install bearings, belts, pulleys, worm drive, linear rail and fasteners without introducing binding or play
  • Wire the controller, drivers and motors correctly with power disconnected
  • Provide a stable 12 V supply and safe outdoor power arrangement
  • Mount and balance the camera or telescope with suitable counterweights
  • Physically align, polar-align, calibrate and guide the real mount
  • Verify tracking, cable clearance and stability before leaving a session unattended
THE BUILD SEQUENCE

How it comes together

1Preparation

  1. Choose the exact sourcing route first

    The current €399 DIY kit includes prepared printed parts plus the main hardware. The €290 hardware-only route and individual sub-kits have different availability, while fully self-sourcing adds printing, insert installation, drilling, tapping and crimping work. Do not mix headline prices across those routes.

    AI + YOU
  2. Prepare printed parts and extrusions

    Print or buy the correct v1.0 parts, install inserts where required and prepare the specified 2020/4040 extrusions. The store extrusion kit is already drilled and tapped; raw self-sourced extrusion is not.

    YOU
  3. Build the base and polar-alignment structure

    Assemble the large bearing-supported base and foldable Alt/Az mechanism, following the source torque and fit guidance. Binding, loose bearings or misaligned extrusion will carry directly into pointing and tracking behaviour.

    YOU

2Build and assembly

  1. Assemble RA and DEC motion

    Build the two-stage belt reduction on RA and the worm-driven DEC axis, setting belt tension, worm preload and bearing fits mechanically. AI can explain the mechanism, but it cannot feel backlash, preload or a sticky axis.

    YOU
  2. Install electronics with power off

    Fit the OAE board, ESP32, motor drivers and steppers using the exact current wiring route. OpenAstroTech warns that the steppers can damage hardware if miswired and says never to connect or disconnect steppers or drivers while the mount is powered.

    YOU
  3. Mount on a rigid tripod and balance the payload

    Use the BOM-recommended sturdy EQ5 or Arca-compatible tripod route, not a lightweight photo tripod. Add counterweights at roughly the mounted gear weight and confirm that clamps, cables and the full imaging payload remain secure through the operating range.

    YOU

3Configure and test

  1. Configure firmware and prove basic motion

    Use the supported OpenAstroTech firmware/documentation route for the actual OAE electronics, then verify direction, limits, homing or reference behaviour and AutoPA motion before attaching expensive imaging equipment.

    AI + YOU
  2. Polar-align, guide and measure the real result

    Commission the mount outdoors, check balance and polar alignment, then use the actual imaging scale and guiding logs to tune the system. Treat the source-published 0.6-0.9 arcsecond RMS figure as a target/specification rather than something the build automatically achieves.

    AI + YOU

Benchmark this project

Use the OpenAstroExplorer v1.0 prompt. Compare what different models deliver, then add what happened when you tried it.

Try this benchmark
View the project prompt

CAIBI adaptation · Prompt 1.0 · Project source

Open and copy prompt →

Benchmark results 0

No reviewed results yet for OpenAstroExplorer v1.0. Add the first result →

AI IN THIS PROJECT

Get AI help on this build

CAIBI · AI CAN HELP

AI can help with

  • Navigate the BOM, CAD, printed-parts list and assembly documentation
  • Separate the complete-kit, hardware-kit and fully self-sourced routes
  • Help check part specifications before ordering or printing
  • Explain firmware configuration and mount-control concepts
  • Help investigate ASCOM, INDI, PHD2 and guiding logs
  • Calculate planning values for balance, gearing and imaging scale
  • Help document modifications after the baseline mount works
CAIBI · AI CAN'T DO

You still need to

  • Choose a latitude, tripod and payload route that suits the actual observing setup
  • Print or buy the mechanical parts and inspect critical fits
  • Drill and tap raw extrusions where the selected sourcing route requires it
  • Install bearings, belts, pulleys, worm drive, linear rail and fasteners without introducing binding or play
  • Wire the controller, drivers and motors correctly with power disconnected
  • Provide a stable 12 V supply and safe outdoor power arrangement
  • Mount and balance the camera or telescope with suitable counterweights
  • Physically align, polar-align, calibrate and guide the real mount
  • Verify tracking, cable clearance and stability before leaving a session unattended
Original source AI use and prompts
SOURCEThe original project does not publish an AI prompt

The prompts below are CAIBI helpers for this build. They are not presented as instructions from the creator.

CAIBI STARTING PROMPTS

Copy a prompt for this build

Each prompt tells AI to keep the original project source as the reference and to flag anything you must verify on the real build.

Ways to take it further
AFTER THE FIRST BUILD

Ways to take it further

Current €399 complete DIY kitHardware/sub-kit plus self-printed parts routeFully self-sourced v1.0 buildEQ5-style tripod installationArca-compatible tripod installationOptional OpenAstroGuider integration
More routes and resources
OTHER WAYS TO GET THERE

You do not have to follow one route.

REVIEWED RESOURCES

Useful places beyond the main source

SOURCE · CAIBI · BUILDERS

What supports the verdict

SOURCEOpenAstroTech

OpenAstroExplorer v1.0 is the current stronger OpenAstroTech assessment target. The repository was pushed in Jan 2026 and explicitly identifies v1.0 as released. The current seller lists the complete DIY kit at €399 and low stock; the source repository separately gives a $200-350 build-cost range. The older OpenAstroTracker remains an active software/community reference, but its €259 full DIY kit and €185 hardware-only route are currently sold out, so CAIBI no longer treats it as the stronger current assessment candidate.

Open source ↗
CAIBIBUILD FOR THE EXPERIENCE

OpenAstroExplorer is a serious open mount rather than a novelty star tracker. The current v1.0 source publishes CAD, printable parts, BOM and assembly guidance, while the seller offers both a complete DIY kit and component routes. It makes sense when learning, modification and ownership of the motion platform matter. If the goal is simply a supported mount that works with minimum setup, a mainstream commercial equatorial mount remains the lower-risk route.

Evidence: Strong

Leave a build review
HAVE YOU MADE THIS?

Leave a build review.

First-hand evidence improves the assessment
What we want to know

What happened when you actually tried to make it.

  • Did it work?
  • Actual time and cost
  • What did you change?
  • What was harder than the source suggested?
  • Would you build it again?