ImageGenCam
Photography & videoOriginal source ↗
CAIBI ASSESSMENT

ImageGenCam

A buildable Raspberry Pi camera designed around a Codex-assisted hardware and software workflow.

CAIBI VERDICTBUILD IT

There is no obvious finished-product equivalent. The point is the combination of custom hardware, image generation and a build process that deliberately gives an AI coding agent meaningful work.

AI CAN HELP

Useful work to hand to AI

  • Code
  • Configuration
  • Iteration
  • Troubleshooting
AI CAN'T DO

The physical boundary

  • Print and finish the enclosure
  • Fit the camera, display, battery and Raspberry Pi into the case
  • Check buttons, clearances and camera ergonomics in the real device
  • Verify that the finished camera survives normal handling
BUILD WITH AI

Start with the project, not a blank prompt.

The CAIBI build pack gives an AI assistant the source, the known constraints, the useful AI work and the physical boundary. It is designed to help you move faster without pretending the AI has built the thing for you.

Preview the full build brief
I want to build ImageGenCam.

Source project: https://github.com/openai/imagegencam

Use the source as the authority. Do not invent parts, dimensions, prices or capabilities that are not published.

AI can help with: Code, Configuration, Iteration, Troubleshooting.
AI cannot physically do: Print and finish the enclosure, Fit the camera, display, battery and Raspberry Pi into the case, Check buttons, clearances and camera ergonomics in the real device, Verify that the finished camera survives normal handling.
Tools and capabilities involved: 3D printer, Raspberry Pi.
CAIBI's main concern: The software is only half the product. Enclosure quality, assembly and camera ergonomics still decide whether the result feels finished.

Start by checking the source, confirming the current parts and build instructions, then give me a staged plan. Clearly separate source facts from your suggestions. Stop and ask me to verify anything that depends on physical fit, wiring, calibration or safety.
THE BUILD

How it actually comes together

Check the source ↗
01
YOU

Get the specified parts

Start with the published Raspberry Pi, display, camera, battery, storage and enclosure parts so the supplied build path matches the hardware in front of you.

02
YOU

Print the enclosure

Print the supplied camera case. The source says PLA and PETG have been tested and recommends PETG because the enclosure folds.

03
AI

Hand the repo to Codex

Open Codex Desktop and give it the ImageGenCam repository. The project is deliberately structured so Codex can guide setup and software work from the source.

04
YOU

Assemble the camera

Fit the display, camera, Raspberry Pi, battery and storage into the printed shell. This remains physical assembly work.

05
AI + YOU

Configure and test

Bring up the camera, verify capture, prompts, album access, Wi-Fi and the phone companion interface. Codex is useful for configuration and debugging, but you still verify the hardware.

06
AI + YOU

Remix it

Change prompts, controls, UI, the Magic Button, camera hardware or enclosure. This is the strongest part of the project for AI assisted iteration.

WHAT YOU NEED

Key components

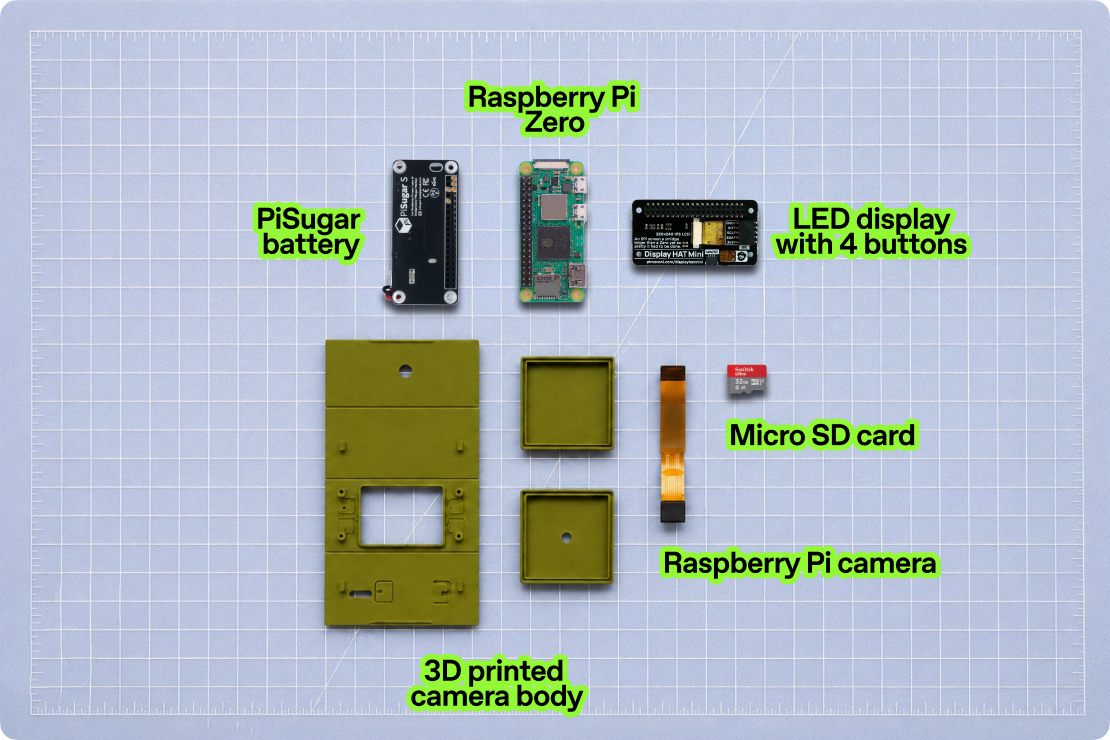
  • Raspberry Pi Zero 2 W with headers
  • Pimoroni Display HAT Mini
  • Raspberry Pi Zero spy camera
  • PiSugar 3
  • 16GB microSD card and reader
  • 3D printed camera case
  • Mac with Codex Desktop, Wi-Fi and an OpenAI account
AFTER THE FIRST BUILD

Ways to take it further

Custom promptsDifferent Magic Button behaviourRestyled UIAlternative camera or display hardwareCustom STEP based enclosure
OTHER WAYS TO GET THERE

You do not have to follow one route.

MADE BY PEOPLE

Real builds belong here.

No reviewed builder listings yet

When people submit completed builds, this section can link to their build notes, repo, printable files, shop or finished version. CAIBI does not take payment or insert itself into the sale.

Add your build or listing
SOURCE · CAIBI · BUILDERS

What supports the verdict

SOURCEOpenAI

Source available and current

  • The source describes ImageGenCam as a weekend build, with experienced users potentially getting it running in under an hour.
  • The published parts list includes the Raspberry Pi Zero 2 W, Display HAT Mini, spy camera, PiSugar 3, microSD storage and a 3D printed case.
  • The source explicitly tells builders to use Codex Desktop to guide the build and encourages modifying software, prompts, controls and the enclosure.
  • No complete current parts total is published in the README, so CAIBI does not invent one.
Open source ↗
CAIBIBUILD IT

There is no obvious finished-product equivalent. The point is the combination of custom hardware, image generation and a build process that deliberately gives an AI coding agent meaningful work.

Evidence
Strong
Biggest challenge
The software is only half the product. Enclosure quality, assembly and camera ergonomics still decide whether the result feels finished.
BUILDERSNo published reports yet

Actual time, cost, changes and outcomes from reviewed builds will appear here.

Add your build report ↓
BUILT IT?

Tell us what actually happened.

Your result can improve the assessment and, if you choose, link people to your public build or listing.

  • What worked and what changed
  • Actual time and cost
  • Public build or repo link
  • Optional maker or sales listing