RECENTLY CHECKED
All projects →
CAIBI ASSESSMENT

OpenMANIPULATOR-X

CAIBI VERDICTWORTH CONSIDERING

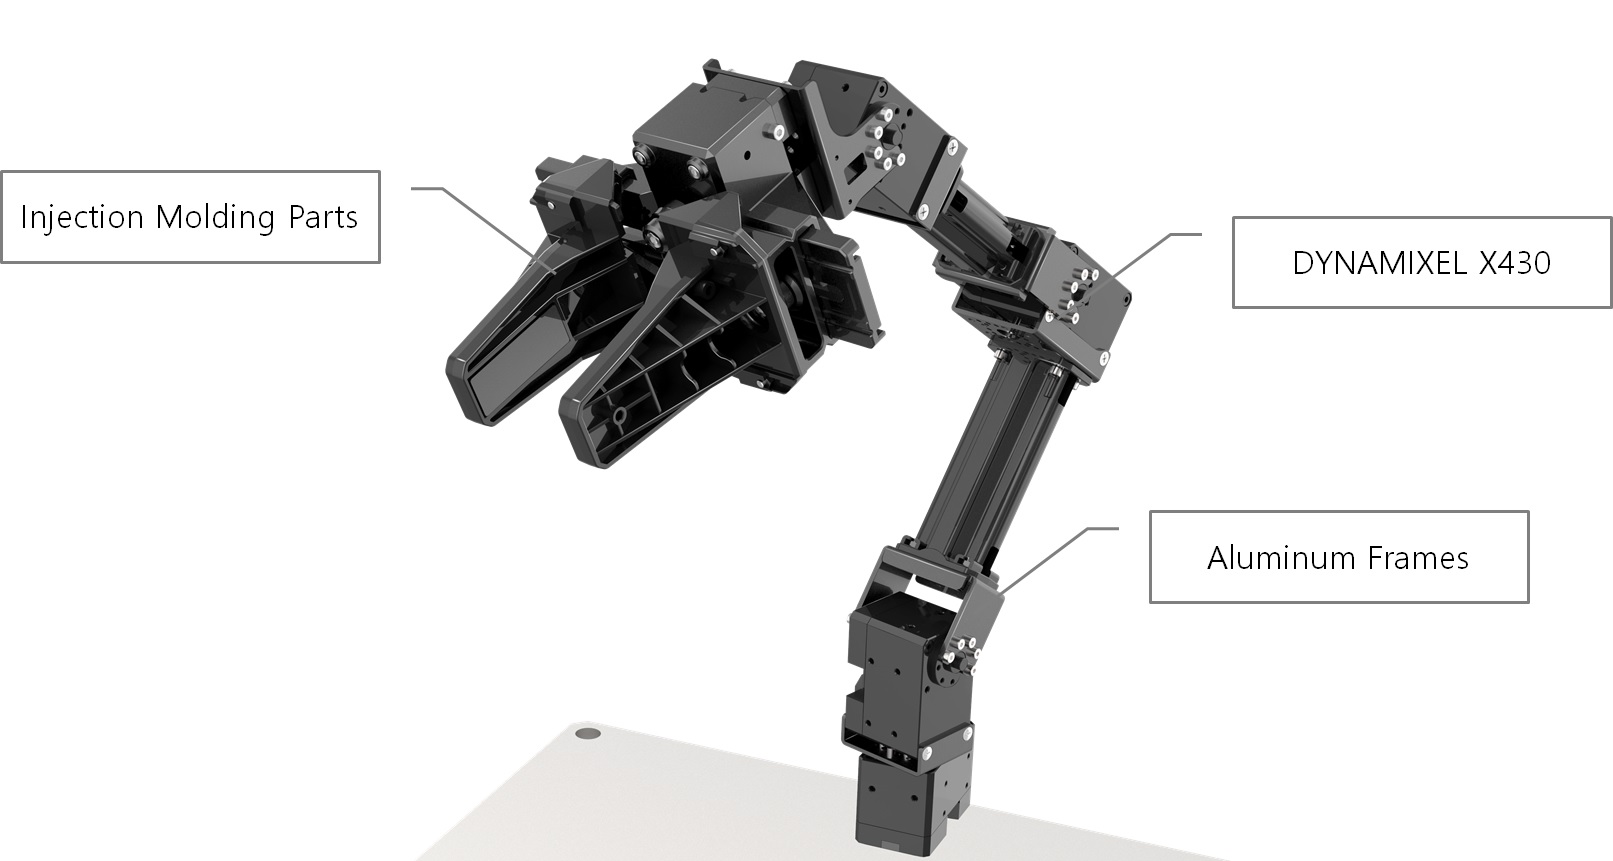
A current open four-axis robot arm and gripper platform built from DYNAMIXEL servos, modular frames and printable parts, with supported ROS 2, MoveIt 2 and OpenCR routes.

Build or buy?

Compare the documented build with the purchase reference.

Build it yourself

Known parts cost£1,205Build total not establishedArm kit only; base and control hardware extra
Time
About 3 to 4 hours physical assembly, plus software and DYNAMIXEL setup
Difficulty
4/5
Physical processes
Basic hand tools · ROS 2 · DYNAMIXEL Wizard · Optional 3D printer
See build requirements →

Purchase reference

Buy price referencePrice not checkedNo priced alternative recorded

Check the source for the exact model, availability and what is included.

Check comparison evidence →
Purchase comparison not yet priced
What the prices cover

Current ROBOTIS arm-kit list price. The base plate and communication/control hardware can be additional.

Includes: RM-X52-TNM arm kit.

Not included: Base plate; U2D2/OpenCR route where not owned; Computer and optional end effectors.

Build evidence recorded 4 Sep 2026. Currency conversions are approximate.

CAIBI records the current ROBOTIS kit price as the project cost basis. Treating the same ecosystem as a separate commercial alternative would double-count the comparison.

BUILD AT A GLANCE

Source view and main parts

Check the source ↗
PHYSICAL BUILD8 key parts or groups
No.Source specification
01Five XM430-W350-T DYNAMIXEL actuators
02ROBOTIS link frames
03DYNAMIXEL daisy-chain cables and the published screw
04Suitable 12 V power supply
05U2D2 plus power hub or OpenCR communication/control route for supported operation
06Rigid base plate or equivalent secure mounting solution
07Computer running a supported ROS 2 environment for the ROS route
08Optional printable parts and custom end effectors from the open hardware ecosystem
Full source specifications
  1. Five XM430-W350-T DYNAMIXEL actuators, including the gripper actuator
  2. ROBOTIS link frames, rail brackets, gripper parts, rods, bushes and servo frames
  3. DYNAMIXEL daisy-chain cables and the published screw, nut, spacer, idler and bearing hardware
  4. Suitable 12 V power supply
  5. U2D2 plus power hub or OpenCR communication/control route for supported operation
  6. Rigid base plate or equivalent secure mounting solution
  7. Computer running a supported ROS 2 environment for the ROS route
  8. Optional printable parts and custom end effectors from the open hardware ecosystem
TOOLS / PROCESSES4 involved
  • Basic hand tools
  • ROS 2
  • DYNAMIXEL Wizard
  • Optional 3D printer
The real-world workYOU STILL HAVE TOThe real-world work
  • Configure each DYNAMIXEL correctly
  • Assemble and align the joints
  • Route and secure cables
  • Mount the arm rigidly
  • Set safe starting poses
  • Test real motion and payloads carefully
THE BUILD SEQUENCE

How it comes together

1Preparation

  1. Choose the control route before assembly

    Decide whether the arm will use U2D2, OpenCR or a supported equivalent and make sure the power and communication hardware are available. The base plate is separately listed and should not be assumed to be in the arm package.

    AI + YOU
  2. Configure and label the five DYNAMIXEL servos

    Use DYNAMIXEL Wizard to verify firmware, protocol, baud rate and IDs 11 through 15 before the servos disappear into the mechanical build. Independent teaching material reinforces that this step is much easier one motor at a time.

    YOU
  3. Build the gripper and arm links

    Follow the official sequence for the rail blocks, gripper, link frames, bearings, idlers and servo frames. Match horn alignment marks and do not treat the many small fasteners as interchangeable.

    YOU

2Build and assembly

  1. Route the daisy-chain cables through the structure

    Connect the specified cable lengths and route them through the arm as shown in the manual before closing the surrounding frames. Check that full joint movement does not pinch or tension the wiring.

    YOU
  2. Mount the arm rigidly and set the starting pose

    Fix the base to a stable surface and manually place the joints in the documented starting pose while torque is off. The official quick-start guide warns that inappropriate joint positions can prevent safe startup.

    YOU
  3. Bring up one supported software path first

    Use the current ROBOTIS ROS 2 bring-up or the supported OpenCR route and prove communication with every joint before attempting MoveIt plans, teleoperation or custom code.

    AI + YOU

3Configure and test

  1. Prove conservative motion before automation

    Run small unloaded moves, verify joint directions and gripper behaviour, then increase the workspace gradually. Only after the baseline machine is repeatable should AI-assisted planning, vision or custom automation be introduced.

    AI + YOU
  2. Modify the platform deliberately

    Use the open CAD, printable parts and modular DYNAMIXEL architecture for link, tool and end-effector experiments. Recheck reach, collisions, load and cable motion whenever the physical geometry changes.

    AI + YOU

Benchmark this project

Use the OpenMANIPULATOR-X prompt. Compare what different models deliver, then add what happened when you tried it.

Try this benchmark
View the project prompt

CAIBI adaptation · Prompt 1.0 · Project source

Open and copy prompt →

Benchmark results 0

No reviewed results yet for OpenMANIPULATOR-X. Add the first result →

AI IN THIS PROJECT

Get AI help on this build

CAIBI · AI CAN HELP

AI can help with

  • ROS 2 and MoveIt setup help
  • Package and launch-file troubleshooting
  • Kinematics and motion-planning code
  • Python and automation integration
  • CAD and end-effector modification guidance
CAIBI · AI CAN'T DO

You still need to

  • Configure each DYNAMIXEL correctly
  • Assemble and align the joints
  • Route and secure cables
  • Mount the arm rigidly
  • Set safe starting poses
  • Test real motion and payloads carefully
Original source AI use and prompts
SOURCEThe original project does not publish an AI prompt

The prompts below are CAIBI helpers for this build. They are not presented as instructions from the creator.

CAIBI STARTING PROMPTS

Copy a prompt for this build

Each prompt tells AI to keep the original project source as the reference and to flag anything you must verify on the real build.

Ways to take it further
AFTER THE FIRST BUILD

Ways to take it further

Custom printed linksAlternative end effectorsVacuum gripperPen holderSCARA configurationPlanar or delta variantsTurtleBot3 mobile manipulationVision-guided MoveIt 2 workflows
More routes and resources
OTHER WAYS TO GET THERE

You do not have to follow one route.

REVIEWED RESOURCES

Useful places beyond the main source

SOURCE · CAIBI · BUILDERS

What supports the verdict

SOURCEROBOTIS

Current manufacturer product, current ROBOTIS documentation and active ROS 2 repository verified. Independent university build material corroborates the physical assembly route and identifies servo configuration and mechanical alignment as the main practical setup traps.

Open source ↗
CAIBIWORTH CONSIDERING

This is less about saving money than owning a supported robot platform that can be physically assembled, modified and then used for serious software experiments. AI can be genuinely useful across ROS 2 setup, MoveIt planning, Python integration, debugging and custom end effectors, while the builder still has to configure and assemble a real multi-joint machine correctly.

Evidence: Strong

Leave a build review
HAVE YOU MADE THIS?

Leave a build review.

First-hand evidence improves the assessment
What we want to know

What happened when you actually tried to make it.

  • Did it work?
  • Actual time and cost
  • What did you change?
  • What was harder than the source suggested?
  • Would you build it again?